A step by step guide to mass drawing. In the bulk drawing, unlike line drawing, an attempt is made to represent the tonal relationships of the subject. The key to viewing the problem simply as an ideal combination of light and shadow rather than real things. This technique can create a distinct look, feel, or mood in a finished drawing or valuable preliminary paintings studies. I hope to explain this theory with the following drawing display, where I used a straightforward and smooth charcoal technique.
Quick tips for drawing in bulk
- As you operate, keep going almost the drawing. Don’t get lost in one area.
- Make sure to pay attention to negative spaces between objects.
- Compare the values frequently, determining which is lighter or darker.
- Don’t enter the details too early.
- When you’re equipped for the final items, the eraser is often more effective than charcoal.
This bulk design does not use lines to describe the shapes. Objects are defined by hue only. Some areas are rendered with a more abrupt tonal transition and a relatively more complex edge when necessary. This drawing method can easily use for any genre. The overall smoothness of the tonal gradation in Nocturne (charcoal, 8 × 9) helps convey a still, lonely nighttime mood.
Draw Hats
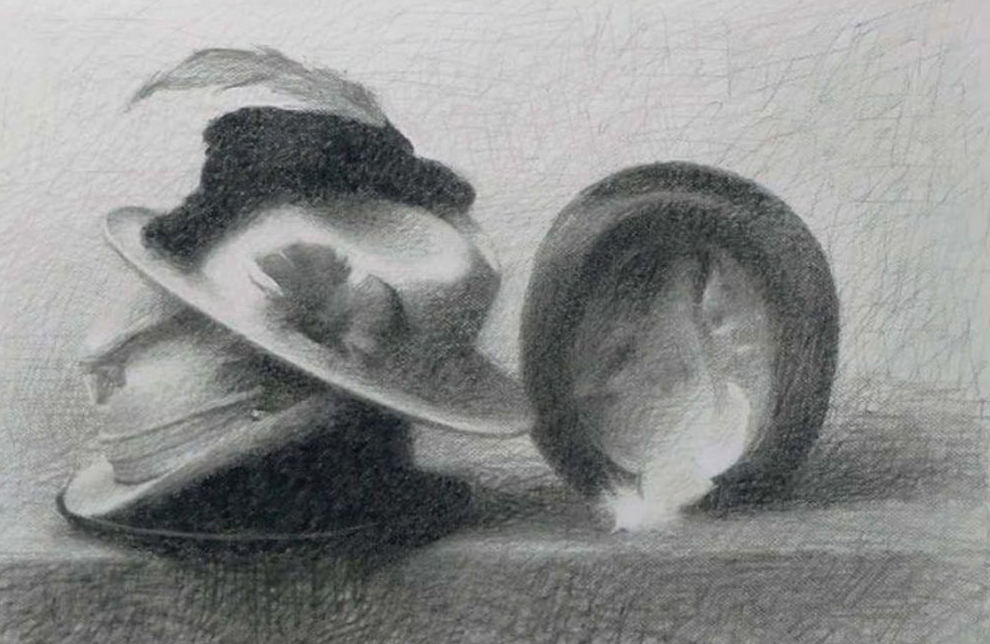
Configuration, approximate measurement
First, I created a still life of a familiar theme, hats, which I have painted many times before. A relatively simple arrangement of hats can still produce many exciting shapes, colors, and shades. I used the visible size method, placing the cool drawings board slightly in front of the installation plan so that the hats are somewhat smaller than the actual size on the paper. Usually, I would have drawn them full size, but my design was too large to fit comfortably on a full-size drawing sheet.
Stepping back about six to eight feet from the design, you can use a ruler horizontally to note where the top and bottom of the objects would be in your setup, then make a few marks on the paper accordingly. Then indicate some of the main verticals and diagonals in the layout to center the image on the page. Take care to lower these marks well before proceeding.
Spotted in the masses
After making these few marks for placement, you can start to identify a few shades right away. Here I used a scribbling technique, moving slightly back and forth with the charcoal, to set the tone. This technique allows the drawing to take shape very quickly without too much preliminary effort. After a few minutes, you have something materializing on the page, and you can start making changes. As you create the shades, you can also shape them. Looking at your point, don’t think of “hats” or whatever the things are, but rather view the complete grouping as a combination of light and dark shades – here, an oblong; there, more than one triangle.
You don’t need to be overly cautious or take extreme measures; coal is a forgiving medium. Also, the idea is not to describe each aspect and then fill it in with color but to let the plans take part as you put the charcoal on it. Clean it with a buff or paper towel if a lump has grown too large or is not positioned correctly.
Different contrast
Try to see both objects and details simply as shades. When you see an outline with sharp tonal contrast from side to side, such as in the mass form of a thing against a different tonal experience or a part of an object that bends sharply in light, please do not consider it a line. Contour is where one tone ends, and another begins. For now, let one shade flow into the next without worrying about gaps to describe what the objects are. It will come fresh. Blur your eyes, squint, and work to see blurred things; this will help you think of still life in terms of spots, such as a blurry photograph, rather than the items themselves. For more direction, you can use a shaped eraser to start adjusting the shapes. Make sure you move through the design as you work so that everything proceeds to the same level.
Correct and define
At this point in my drawing, the individual objects began to take shape as if emerging from the mist. You can bring things into focus by sharpening the outlines with the kneaded eraser or adding essential accents. Find the darkest darkness; in this arrangement is the shadow projected on the lower hat. The white inside the vertical cap is the brightest light in the service, so I let the white paper do the trick. Everything falls between these two extremes, so be sure to judge the tones correctly and note where they lie in the overall pattern.
As you get closer to the dark, you may find that the carbon no longer wants to stick after a certain point but starts to peel off. If you wish, you can use a workable setting spray throughout the design and then continue working on it. As you create the tone, continue to use the tip of the charcoal in crisscrossing strokes. As the hue increases, the stroke patterns flatten into a softer shade or shade. With the kneaded gum, you can further even the tone by simply removing a dark line or dot here and there.
Further refinement
Keep your charcoal sharp for the final stages and blend the tones by adding highlights and shadows and selecting sharper edges to contrast softer ones. As with the tonal scheme settings, you can also set an edge scheme by choosing which edge will be the strongest and which will be the softest. In this design, the shadow cast under the lower hat blends seamlessly with the brim of the hat itself so that the hat line completely disappears in tone. As for the sharper edge, I got to the edge of the vertical hat, where it meets the white on the inside.
Use the sharp carbon tip for remarkably even and flat tones and evenly fill weak areas between the strokes. It takes patience! For this design, however, I initially chose to use the rougher side of the paper to allow the texture to show through and kept the stroke pattern a bit more open to softening the whole effect.
Finishes
I only entered the detail at the end, and even then reluctantly, stating only what is necessary to describe accessory shapes, such as feathers and hat ribbons. Keeping details to a minimum preserves unity and smoothness in design. Depending on my intention for a particular structure, sometimes I would consider completing a part between steps 4 and 5. Or I could decide to go one step further, as I have done here. This representation of Cappelli defines my forms. But as a result, some of the tonal smoothness and mood is lost. When you decide to stop working on a piece, it is up to you and your goal for that particular design.
Contents